Alright, so I finished the tutorial! For some reason the texture doesnt show up  but I followed every step and understand the concepts fairly well.
  I didnt manage to shape all the UV's to quite the level of perfection as in the example, and that might be why the textures didnt show up, and I will take the time to make sure they are exact when I am texturing the ship itself
-
Visit our website www.piratehorizons.com to quickly find download links for the newest versions of our New Horizons mods Beyond New Horizons and Maelstrom New Horizons!-
Quick links for Beyond New Horizons
- Download latest version
- Wiki - FAQ - Report bugs here - Bug Tracker on Github -

Quick links for Maelstrom
- Download the latest version of Maelstrom
- Download the latest version of ERAS II - Download the latest version of New Horizons on Maelstrom
-

Quick links for PotC: New Horizons
- Download latest version
- Wiki - FAQ - Report bugs here
-

Thanks to YOUR votes, GOG.com now sells:
- Sea Dogs - Sea Dogs: Caribbean Tales
- Sea Dogs: City of Abandoned Ships
Vote now to add Pirates of the Caribbean to the list! -
Quick links for AoP2: Gentlemen of Fortune 2
- Downloads and info
- ModDB Profile
- Forums Archive -
A Pirate Podcast with Interviews
Music, Comedy and all things Pirate!
- Episode Guide - About - Subscribe -
- Twitter - Facebook - iTunes - Android -
- Youtube - Fill the Coffers -
You are using an out of date browser. It may not display this or other websites correctly.
You should upgrade or use an alternative browser.Released 20 gun privateer schooner
- Thread starter Captain Armstrong
- Start date
You mean the texture doesn't show up in the scene? For that, in viewport hit '6'. It will set the smooth shade + texture mode. Or are you trying to render to texture?Aha, Thanks Iron Roger Flint! the texture shows up now For future reference, here's a couple of shortcuts for the model display in Maya:
- Wireframe mode: Numpad 4
- Un-textured polygon mode: Numpad 5
- Textured polygon mode: Numpad 6
If you're ready for mapping the UVs on your model, I'll have a look myself to test out a few things, and then give you a few tips to get you started.
Sounds great! Im ready to start whenever you areFor future reference, here's a couple of shortcuts for the model display in Maya:
- Wireframe mode: Numpad 4
- Un-textured polygon mode: Numpad 5
- Textured polygon mode: Numpad 6
If you're ready for mapping the UVs on your model, I'll have a look myself to test out a few things, and then give you a few tips to get you started.
 OK, after some experiments, I don't think this will be too difficult at all.
Selecting polygon faces and then going to "Edit Polygons -> Texture -> [Something] mapping" will automatically generate UVs, so we don't need to worry about them being absent before.
So, here's a few tips:
- You will need to experiment with which mapping method works best for which part of the model, because the effectiveness can vary hugely.
For example, 'Planar mapping' works well for the deck, and 'Cylindrical mapping' works well for the gun barrels (see screenshot below).
Speaking of the deck, you should probably do it in 2 or 3 sections, so the wooden planking pattern in desk.tga can recur smoothly along the length of the ship.
In some cases, like the hull sides, I'd recommend 'Automatic mapping'. That way, it takes the curve of the hull into account, so the UVs are true to the polygons, and there will not be any distortion.
- You'll have to do small chunks at a time, since selecting the whole hull and going with Automatic mapping just makes a mess.
This will get very tedious, especially since all the UVs need mapping from scratch. Most modellers use standardised ship components, such as cannons/anchors etc, which eliminates the need to remap the UVs for those objects for each new model, so that's something to think about in future.
- These are some textures you can use from Beta 2 which will make your job a lot easier, and be much more efficient than making new ones from scratch:
- desk: for the deck, masts, anchors, belfry, capstan, and various other details. VERY useful texture.
- inzanegun1: recommended for the best-looking cannons, rather than using desk.tga.
- metalU2 or metalU4: for all things metal.
- ropeU1: have a guess!
- woodGrainU# (where # = 1, 2, 3 or 4): endless applications for details like railings, gratings etc. Ideal for being lazy with UV mapping, because it's very uniform.
- wood_red, wood_mrn, wood_grn: planking for the inner hull; red, maroon and green respectively.
- RN_Hull1, FR_Hull1 or US_Hull1: this is what several of Pgargon's ships now use in Beta 2: generic RN, French and US hull textures for 18/19th century vessels. Accounts for black and one other colour for the main hull, and a different colour for the underwater hull (not quite coppering, but fairly close).
IMPORTANT: you'll need TX Converter to get the TGA.TX files in RESOURCE/MODELS/Ships into TGA format that Maya supports. The interface is fairly self-explanatory, but let me know if you need any help with it.
For this number of textures, you may also need to split parts of the model into separate parts (e.g. ropes on outer hull should be made a separate component).
My advice is to copy the whole outer hull component, in this case, and delete the ropes on one version, and the rest of the hull on the other version.
This is because you can only use one material (and corresponding texture) per component.
- A helpful tip for selecting lots of polygon faces quickly is to select one face, and then press [Shift]+[.] (to use the > symbol) over and over again until all the faces you want are selected.
This can literally save hours of selecting faces one-by-one, but often you still have to add/subtract a few faces from the selection manually to get what you need.
Here's a screenshot of the gun barrel and corresponding UVs I quickly tested out:
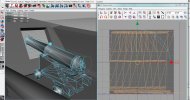
You'll have to use the Manipulator Tool (beneath the Scale Tool if you lose it) to get the cylinder in the right position; the UV arrangement produced pretty much matches that in most existing cannon textures.
Anyway, I hope that's enough to get you going. It will take some time, as I said, but you'll get faster at it with practise.
If you have any more questions, let me know. I might have forgotten some advice (like before! ), so if I remember anything else I'll update you ASAP.Thank you so much Armada! haha I actually think I understand what I have to do
 I actually already use standard parts, but most of them are my own like captsans, wheels, pinrails, deadeyes etc. I just havent finsished a ship yet so they arent mapped. Now say I were to texture a carronade in a seperate file for standard use in maya, is there a way I could apply those same textures and UV Maps to the ones on the Prince? Or would I have to replace them all with the textured one?The easiest would be to use the UV mapped and textured carronades to replace the ones on the Prince. I know it's impossible to copy-paste the UV's onto objects that are not copies or instances of each other. You can apply the same textures for sure, but if guns on the Prince aren't UV mapped, they will look like something that got in a very bad lawnmower accident, and you'll still have to UV map them
 hmm, ill just replace them with a textured one then, does anyone have a (already UV Mapped) model of the standard high detail cannons they could upload? one that I could use inzanegun1 for, and replace the chasers with.There was a collection of guns models and stuff you could use on your ships, but I don't know where it's currently located. Armada should know, so he'll give you links
I don't actually remember seeing such a collection on the FTP, but I'll have a look around anyway. :mmThere was a collection of guns models and stuff you could use on your ships, but I don't know where it's currently located. Armada should know, so he'll give you links
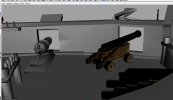
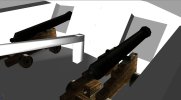
If I can't find it, I'll upload a model of both a cannon and carronade that use inzanegun1.tga.well ive already started texturing my own carronade model, so id like to use that, but the cannon would be great! Alright, so using the guns from the greyhound, I now have a a good standard cannon model that is uv mapped and textured using inzanegun1.
 I replaced the prince's chase guns with it, here are a few screens
The carronades are more troublesome, I made a simple texture just from a yelllow wood and metal texture (from the game) and all of the cylindrical parts show as textureless and see-through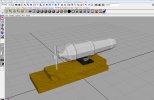
anyone know what i mightve done wrong with the carronades?You probably added the map to transparency node instead of color. Right click on 'transparency' (the actual word) and select 'break connection'.
for the future add textures only to 'color' nodeno, I just checked and its definately set on color, maybe its the uv mapping? Could you show a screenshot of the UVs as they appear in the UV Texture Editor?
Also, I would strongly recommend using the inzanegun1 texture for your carronades too; it's more desirable than making new ones, in terms of the Build Mod's size.
Pgargon did this successfully for several ships (RN_Surprise, HMS_Bellona, for example), and I think they fit in well with the standard cannons.
Hmm well I wanted to have a yellow or red painted base but if all else fails I do that for my carronades too. heres a screenshot of the UV'sCould you show a screenshot of the UVs as they appear in the UV Texture Editor?
Also, I would strongly recommend using the inzanegun1 texture for your carronades too; it's more desirable than making new ones, in terms of the Build Mod's size.
Pgargon did this successfully for several ships (RN_Surprise, HMS_Bellona, for example), and I think they fit in well with the standard cannons.
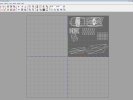 Now that you mention it, there is actually a red version of inzanegun1.tga, called inzanagun1.tga, which you could use. (Look at FR_Boussole for example)
Either way, it's better to use one of those textures because they're interchangeable and easy to edit.
If you wanted a yellow version, I could probably do that. I was thinking of making one for the realistic HMS Victory, anyway.
I can't readily see why your UVs wouldn't work, unfortunately. I'll look at my copy of the model and see if I can make some UVs that work correctly.
One thing I'd say is not to have UVs mapped in a 3D perspective, like some of your box-shaped parts. Might be better to use Automatic mapping for a better result.
A yellow version would be great!Now that you mention it, there is actually a red version of inzanegun1.tga, called inzanagun1.tga, which you could use. (Look at FR_Boussole for example)
Either way, it's better to use one of those textures because they're interchangeable and easy to edit.
If you wanted a yellow version, I could probably do that. I was thinking of making one for the realistic HMS Victory, anyway.
I can't readily see why your UVs wouldn't work, unfortunately. I'll look at my copy of the model and see if I can make some UVs that work correctly.
One thing I'd say is not to have UVs mapped in a 3D perspective, like some of your box-shaped parts. Might be better to use Automatic mapping for a better result. would you move anything? like if I used the brown or red version my uv's would still be in the right place for the yellow version when you make it? I'll upload a new version of my carronade, ive made some changes to the model since I built the Prince.
download "Carronade.Mb" here http://www.pyratesahoy.com/potc/Capt%20Armstrong/ship%20fittings%20models/
It would be completely compatible with the UVs for Inzanegun1, so don't worry about that.A yellow version would be great! would you move anything? like if I used the brown or red version my uv's would still be in the right place for the yellow version when you make it?

I'll take a look at your carronade model later.


