I don't recall any of the luggers having copper plating... which texture do you mean?EDIT: If you have access to them, I'd love to have the Copper texture from the Lugger if possible @Armada .
-
Visit our website www.piratehorizons.com to quickly find download links for the newest versions of our New Horizons mods Beyond New Horizons and Maelstrom New Horizons!-

Quick links for Beyond New Horizons
- Download latest version
- Wiki - FAQ - Report bugs here - Bug Tracker on Github -

Quick links for Maelstrom
- Download the latest version of Maelstrom
- Download the latest version of ERAS II - Download the latest version of New Horizons on Maelstrom
-

Quick links for PotC: New Horizons
- Download latest version
- Wiki - FAQ - Report bugs here
-

Thanks to YOUR votes, GOG.com now sells:
- Sea Dogs - Sea Dogs: Caribbean Tales
- Sea Dogs: City of Abandoned Ships
Vote now to add Pirates of the Caribbean to the list! -

Quick links for AoP2: Gentlemen of Fortune 2
- Downloads and info
- ModDB Profile
- Forums Archive -

A Pirate Podcast with Interviews
Music, Comedy and all things Pirate!
- Episode Guide - About - Subscribe -
- Twitter - Facebook - iTunes - Android -
- Youtube - Fill the Coffers -
You are using an out of date browser. It may not display this or other websites correctly.
You should upgrade or use an alternative browser.WIP Steam Gunboat
- Thread starter Robert Nutter
- Start date
It's the default ship for the Hawk storyline? I thought it was the coastal lugger but I may be wrong...whatever it is, it definitely has metal below the waterline. I'll try and get a screenshot...
Pieter, so it's as relatively simple as copying the entries and modifying smoke placement? Neat That would be the lugger vml. It uses the bortout method so the part you want would have to be cut out and made into its own texture.That's the one! Given that I'm only just learning the very basics of UV and Photoshop, I've found a few textures I can use which are fairly similar so as to remain consistant, so I'll give them a try and if it needs changing to this one further down the line for greater conformity, that's always an option...
 I've given Thagarr and Armada's manuals a read and think I'm starting to get this stuff a little ie how to install the textures, export the model etc. Few things I'm foggy on...not least how to determine and organise the co-ordinates for locators, but I'm sure I'll get it eventually using Armada's great guide.Last edited:I'm ripping my hair out with the textures here...I know it's got to be a single .tex for it to work in-game, but I'm having trouble even splitting the model into 7 or 8 maps, let alone one. Here's my relaxed boiler map, *just* for the boiler/whistle etc. I tried pinning stuff together a bit more logically but it doesn't make much difference with all those tiny components (I'm not even what most of them even are! The only small parts are the rivets which are clearly visible as spheres near the bottom...)
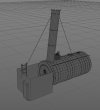
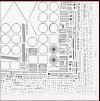
There must be something I'm doing wrong here? I can't find anything online to explain why such a comparatively simple model is doing this. As this is going to be hell to put together into a single map with my amateur Photoshop skills... I think maybe I need to hit the tutorials again as I must be going wrong somewhere...this is such a simple model with less than 25k Tris, I can't even imagine how some of you guys do the bigger more complicated ships! Must be simply down to experience.It doesn't have to be a single map. You can use plenty textures.
Just try not to go overboard. Really?
 As I was under the impression after looking through the texture folders that it's preferable to only have one per model, so as not to clutter things up in there. This is my first ever foray into UV mapping (i've always just used planar mapping before) so it's dropped me in at the deep end a bit!
The stock game ships had one texture file per ship. But many of the mod-added ones use several.As I was under the impression after looking through the texture folders that it's preferable to only have one, so as not to clutter things up in there!
To prevent excessive clutter, they are reused between ships though.
I think @Hylie Pistof likes the way it works on those mod-added ships because it allows swapping colours using HEX editing. I'm probably going to end up with 7 or 8 (at the absolute most) unique maps, and a couple of shared ones (the gun and the deck planking, if someone could give me that possibly?) Things specific to steam like the whistle, bulkhead compartment door, boiler and wheel can probably be re-used on future steamship models (my Demologos model uses an almost identical funnel, for instance) so I think it's probably worth having them divided for that.
I really need to have a play with the HEX and Tex editors...I've gotten familiar with the GM viewer so should probably do that next.Last edited:
You can use http://piratesahoy.net/build/tools/Modeling+Texturing/TX Convertor.zip to convert the files in RESOURCE\Textures\Ships back to TGA, then use those.the gun and the deck planking, if someone could give me that possibly?
Done.(Pieter, would it be possible to have this convo moved over to the thread for the steamboat...I don't know why I posted it here, sorry about that )
Ah, so it works the other way too? Splendid!
Thanks for that! I got my threads confused, I think
Yup. Would've been super annoying if it didn't. But it does.Ah, so it works the other way too? Splendid!
Been there, done that! Of course I am able to fix my own mistakes if that happens....Thanks for that! I got my threads confused, I think
 For guns and decks you might want to look at inzanegun and its variations with the TX converter. There are a LOT of textures in the POTC-->resource-->textures-->ships folder. Browse there and find the ones you like.@Robert Nutter, sorry about the textures, I haven't had enough time to sort through and upload them this week.
If you're happy to use TX Converter to grab the textures from the game yourself, I recommend using these ones:
- WoodDeck2.tga for the deck planking
- metalU2.tga and metalU4.tga for your boiler and other metal components
- RopeU1 for ropes
- hatch.tga or hhtch.tga for wooden gratings
- WoodGrainU1.tga for non-planked wooden parts (recommended for railings and the bow section of the keel above the waterline)
- wood_mrn.tga for inner hull planking
- plank_[colour].tga (and anything called "phank_" or "ph3nk_") - Use one of these for the outer hull. The naming convention is a bit of a mess and there are several duplicates, but stick to textures the same size and shape as plank_white for reference and that will allow more customisation options for the ship.
- plank_white.tga - This is used for the underwater hull on some pre-copper ships, and I'd suggest using the same size and proportions for a new copper texture so it would be compatible with these ships and future ones.
- Victory1.tga - The bottom section of this is the current best copper sheathing texture we have, for reference.
Mapping out every individual component like that is far too much hassle for what it's worth, so I always try to keep the UVs simple.I'm ripping my hair out with the textures here...I know it's got to be a single .tex for it to work in-game, but I'm having trouble even splitting the model into 7 or 8 maps, let alone one. Here's my relaxed boiler map, *just* for the boiler/whistle etc. I tried pinning stuff together a bit more logically but it doesn't make much difference with all those tiny components (I'm not even what most of them even are! The only small parts are the rivets which are clearly visible as spheres near the bottom...)
Two things you should know about the UVs for this game: they can overlap, and they can exceed the 0 to 1 UV space. The latter is necessary for tiling textures, since we can't do that through the game's materials.
For example, with your boiler, I'd use a cylindrical map for the sides of the tank (including all the small details on its surface) and a planar map for the front and back of the tank. I'd do the same for the funnel, and then use box mapping for the component just behind the funnel. That should produce far fewer UV components and make it easier to scale them for a tiling metal texture.I've tracked a few down in there and I'll give those examples a try @Armada , thanks for the recommendations! Though I'll be brutally honest, I don't entirely understand how the tiling system works yet (ie taking simple non-UV textures and telling the engine to repeat it to the model/material without the use of a map) but I'm sure things'll become clearer to me once I get it all into Maya together. I'm sure learning a tonne more about UV doing this than I would have otherwise
About the process you describe: so far I've just split the model into 8 components (Boiler section inc.funnel, Door compartment inc.bunkerage, Deck, Hull, Keel/Rudders, Paddle wheel parts and on-deck elements (ie the flag-pole, hatches, gun tracks etc) and of course the gun itself which is using the inzanegun texture) and I've done most of them in photoshop then shipped out as TGA's. I then (very stupidly and noobishly) combined the boiler mesh with everything around it (including the funnel, the fire hatch, the gauges and the safety valves) which could be an issue. I did it as I thought it could help if I baked some of the planar textures into a map then reapply and do it that way, but instead it had the opposite effect...as you can probably imagine. But that's some great advice and I'm going to try and find a way to retrofit it so that becomes possible again...I'm guessing there's no way of easily reversing a mesh combination? If not, I'll just have to push forward with doing it awkwardly and bear all this in mind for my next project. I'll revisit this once I understand UV more fully, though I think what I've done so far should more than suffice for the time being. It's just the boiler giving me a headache!As an example, this is what my UV for the door compartment ended up looking like (prior to textures going on in PS)...box mapping did work quite nicely for it, but I couldn't get my head round how to then map textures to that without screwing up the door wheel/ladder. So I know it's not the cleanest UV in the world but hey, I'm still learning! The 'mess' in the bottom right is just unused faces...I was unsure what effect deleting them would have so I just stuffed them in the corner
Last edited:Just an update. I've been spending a bit more time on the mansion than this recently, but managed to make a few decisions.
I've decided to follow your instructions as best I can @Armada and apply the textures you've outlined above. Mostly because I only today properly learnt how a UV tag works, which means I now understand how to make use of the existing textures. However, I've got a custom map the outer hull that I did before, which I'm rather liking but can't figure out a better way of doing it using existing tga's/tiled texture, what with the capstan rust stain and weather marks down the side. Do you think it'd be at all compatible or should I just start again using existing textures for the outer hull so it better transfers over to other models?

EDIT: I've also experimented with using a few textures on the mast...all's well so long as it ships to Maya ok.
 Last edited:This is the trade-off that you need to make regarding the hull texture:
- Non-tiling textures can have custom detailing like the rust in your example, but cannot be reused on other ships, and by extension, your ship can't reuse another ship's texture. These textures also have to be higher-res (up to 2048 x 2048px) to look good up-close.
- Tiling textures sacrifice custom details for compatibility with other ships, which also means your UVs are compatible with similar textures.
In an ideal world, we would have tiling textures with separate custom textures overlaid on top of them to add detail, but as far as we know, this is impossible with the Storm Engine.
The closest I've seen to this is the stock game's "Black Pearl", which shares the same deck texture as other stock ships, but it uses another texture as a sort of overlay to darken it. I have never been able to reproduce that effect on other ships, or to find out how it was done in Maya in the first place. I'll have a think about that, then. I notice a lot of ships have their own custom textures already so I'm guessing it's not an issue if I choose to do that, it's just the cross-compatibility thing.
I'm guessing there's no way of using a diffuse layer to do that in Maya? As none of my textures right now are in the diffuse channel in my UV meta (unless I'm misunderstanding the definition of diffuse in this context) but if I apply one, I can get the desired effect (ie tiled planks with alpha rust overlay) quite easily. Also, super duper noob question, but how do the textures know where the texture directory is once the model's in the game? As I'm just applying them from a random folder on my desktop at the moment, thinking I'll relink them properly once it's in Maya...should I not be doing that?


