0) Preparations.
Character models are just grey in GM-viewer and Aniview is ok but not for complex models. We can use the TOOL to see what we’re doing instead.
Create a folder somewhere in your computer.
Use the TX-converter to make .tga files in that folder of all or just some of the files in RESOURCE/Textures/Characters.
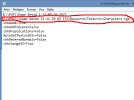
Open TOOL/VrmlImExporter.ini.
Change the adress on the second line to point to your new folder.
(in my example it’s placed inside an old game – don’t think that’s important)
1) Switch.
TOOL/Extras/Mix Characters gives this menu:
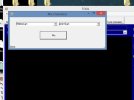
Choose the two models you want to mix in the two windows.
(I have chosen Maltese and Pirate12)
Mix!
The Tool creates a folder in MODELS/Characters called Mixed.
Here you find the two possible combinations. Delete the one you’re not interested in.
2) Adjustments.
TOOL: uncheck ShowSkeleton box (to the right). Open your mixed model.
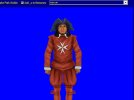
He looks ok but seems to have no neck.
Scene/Edit Scene. Move around the two windows so you can see both the character and the left part of Edit Scene.
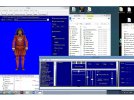
Edit Scene: you can see the model parts by clicking the + to the left of (pirat12Maltese)
In this case:
Hand_right7 and Without16 (the names are never of any help) So which one is wich?
Click Hand_right7 and try the third slider fro the left (Up/Down) Yes! That’s the head.
If you tried the wrong one open the model again.
The four left sliders are (from left):
Left/Right Back/Forth Up/Down Change size
We want to adjust the head a little (and keep the body as it is so it not will fly above the ground).
Using a slider: you can try the center wheel of the mouse. Maybe it gives to big steps.
You can try push the slider up and down. Maybe it’s difficult to do it exactly.
The third alternative is (still Hand_right7 lit) Change the value in the middle window above
the Move to Position button.
When you’re happy with it press Move to Position. Save Gm (on the standard TOOL window).
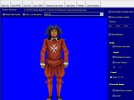
Now let’s check if the head’s ok from other views.
TOOL/Open GM (your model) click on the model (or the blue) and keep the button down.
Now you can turn the model around a little. The hair and the face don’t match too well.
Scene/Edit Scene click the + left of the model name and click Hand_right7 (the head).
Use slider 2 from left and try to make the face with the hat fit better.
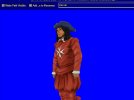
Rename you model to Maltese3 (for ex).
3) The talking head.
The “mix characters” method doesn’t work for the talking head models.
TOOL/MODELS/Heads/h_pirate12.
a) Retexture.
First we check if the torso part of this model can be retextured to look like
a red Maltese outfit. The chances in this case are good. But we will loose the long hair. (Retexture is explained in another tutorial) We will try a work around instead.
b) Add an extra head.
TOOL/Open Gm/Characters/Mixed/Maltese3.
Scene/Edit Scene click the + left of Maltese3.
We know that Hand_right7 is the head so the Without16 is the body. Click it. Delete.
Save your cut off head as Maltese3_head for ex. (TOOL/File/Save gm as)
Close the TOOL. Open the Mixed folder (not with the TOOL)
Also open the Meshes folder under the TOOL.
Copy the Maltese3_head into the Meshes folder.
TOOL/MODELS/Heads/h_Maltese
Scene/Edit Scene
Click the full name h_Maltese (should be lit)
Find Maltese3_head in the left widow. Doubleclick it. Save Gm.
Rename h_Maltese_x to h_Maltese3. Open it with the TOOL.
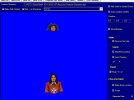
Adjust the head as earlier with sliders etc.
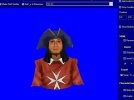
Be sure to place the added head just a little in front of the original one. The fact that it looks weird from side and from back doesn’t matter here.
c) Retexture + add extra head.
If it’s not possible to hide the old head the third method is to use another talking head
as a base. That should be one without a too large hat. And the torso part must be possible to retexture as well. So this is a combo of a) and b).
Another option in our example could be to use h_Pirate12.gm as the base.
Retexture the torso to Maltese style.
Make another switch head with at least one korsar1. (black hair - no hat).
Cut out that korsar1 head and place it in the Meshes folder.
Add the head to h_Pirate12 and place it just a little behind pirate12’s face.
In the future in POTC:NH Remastered no talking heads will be used.
In RESOURCE/animation/heads you also have to copy either h_Maltese.ani or h_Pirate12.ani and rename it to h_Maltese3.ani.
4) Adding other 3D-parts.
The method a) of adding something extra to a character model can be applied to other 3D objects such as an extra pistol, a sash, a feather in the hat etc etc.
Not all 3D elements are possible to combine.
One trick which sometimes helps is to save the part you want to add as VRML file first.
Now open it with Open VRML. If the model still looks ok save it again as a Gm-file. Use that one in Meshes folder.
If the model looks bad when opened as VRML:
There are these buttons in the TOOL window to the right: Reverse Normals, Invert Texture.
Try checking one or the other or both to make the model look normal. Then save as GM.
And to Meshes.
Here’s an example of 1 switched head, 4 added meshes and 5 retextures.
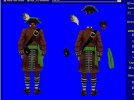
//JRH
Character models are just grey in GM-viewer and Aniview is ok but not for complex models. We can use the TOOL to see what we’re doing instead.
Create a folder somewhere in your computer.
Use the TX-converter to make .tga files in that folder of all or just some of the files in RESOURCE/Textures/Characters.
Open TOOL/VrmlImExporter.ini.
Change the adress on the second line to point to your new folder.
(in my example it’s placed inside an old game – don’t think that’s important)

1) Switch.
TOOL/Extras/Mix Characters gives this menu:

Choose the two models you want to mix in the two windows.
(I have chosen Maltese and Pirate12)
Mix!
The Tool creates a folder in MODELS/Characters called Mixed.
Here you find the two possible combinations. Delete the one you’re not interested in.
2) Adjustments.
TOOL: uncheck ShowSkeleton box (to the right). Open your mixed model.

He looks ok but seems to have no neck.
Scene/Edit Scene. Move around the two windows so you can see both the character and the left part of Edit Scene.

Edit Scene: you can see the model parts by clicking the + to the left of (pirat12Maltese)
In this case:
Hand_right7 and Without16 (the names are never of any help) So which one is wich?
Click Hand_right7 and try the third slider fro the left (Up/Down) Yes! That’s the head.
If you tried the wrong one open the model again.
The four left sliders are (from left):
Left/Right Back/Forth Up/Down Change size
We want to adjust the head a little (and keep the body as it is so it not will fly above the ground).
Using a slider: you can try the center wheel of the mouse. Maybe it gives to big steps.
You can try push the slider up and down. Maybe it’s difficult to do it exactly.
The third alternative is (still Hand_right7 lit) Change the value in the middle window above
the Move to Position button.
When you’re happy with it press Move to Position. Save Gm (on the standard TOOL window).

Now let’s check if the head’s ok from other views.
TOOL/Open GM (your model) click on the model (or the blue) and keep the button down.
Now you can turn the model around a little. The hair and the face don’t match too well.
Scene/Edit Scene click the + left of the model name and click Hand_right7 (the head).
Use slider 2 from left and try to make the face with the hat fit better.

Rename you model to Maltese3 (for ex).
3) The talking head.
The “mix characters” method doesn’t work for the talking head models.
TOOL/MODELS/Heads/h_pirate12.
a) Retexture.
First we check if the torso part of this model can be retextured to look like
a red Maltese outfit. The chances in this case are good. But we will loose the long hair. (Retexture is explained in another tutorial) We will try a work around instead.
b) Add an extra head.
TOOL/Open Gm/Characters/Mixed/Maltese3.
Scene/Edit Scene click the + left of Maltese3.
We know that Hand_right7 is the head so the Without16 is the body. Click it. Delete.
Save your cut off head as Maltese3_head for ex. (TOOL/File/Save gm as)
Close the TOOL. Open the Mixed folder (not with the TOOL)
Also open the Meshes folder under the TOOL.
Copy the Maltese3_head into the Meshes folder.
TOOL/MODELS/Heads/h_Maltese
Scene/Edit Scene
Click the full name h_Maltese (should be lit)
Find Maltese3_head in the left widow. Doubleclick it. Save Gm.
Rename h_Maltese_x to h_Maltese3. Open it with the TOOL.

Adjust the head as earlier with sliders etc.

Be sure to place the added head just a little in front of the original one. The fact that it looks weird from side and from back doesn’t matter here.
c) Retexture + add extra head.
If it’s not possible to hide the old head the third method is to use another talking head
as a base. That should be one without a too large hat. And the torso part must be possible to retexture as well. So this is a combo of a) and b).
Another option in our example could be to use h_Pirate12.gm as the base.
Retexture the torso to Maltese style.
Make another switch head with at least one korsar1. (black hair - no hat).
Cut out that korsar1 head and place it in the Meshes folder.
Add the head to h_Pirate12 and place it just a little behind pirate12’s face.
In the future in POTC:NH Remastered no talking heads will be used.
In RESOURCE/animation/heads you also have to copy either h_Maltese.ani or h_Pirate12.ani and rename it to h_Maltese3.ani.
4) Adding other 3D-parts.
The method a) of adding something extra to a character model can be applied to other 3D objects such as an extra pistol, a sash, a feather in the hat etc etc.
Not all 3D elements are possible to combine.
One trick which sometimes helps is to save the part you want to add as VRML file first.
Now open it with Open VRML. If the model still looks ok save it again as a Gm-file. Use that one in Meshes folder.
If the model looks bad when opened as VRML:
There are these buttons in the TOOL window to the right: Reverse Normals, Invert Texture.
Try checking one or the other or both to make the model look normal. Then save as GM.
And to Meshes.
Here’s an example of 1 switched head, 4 added meshes and 5 retextures.

//JRH


